|
A brand new version of our popular Chrome extension, Easy Auto Refresh, has been released. This update is a major version release and has some big new features packed in. For starters, it's been completely optimized for speed and memory! Even better, it's packed with two powerful new advanced options for registered users, which are detailed below.
Refresh all tabs
When you checkmark the new advanced option "Refresh all tabs", any time the current tab refreshes, it will also refresh all other tabs in the browser window. For example, suppose you have 3 tabs open. On the first tab, you checkmark the option "Refresh all tabs". Then you click "Start". When the first tab refreshes, it will also refresh tabs 2 and 3 at the same time. This feature is meant to be a time saver, allowing you to refresh multiple web pages, without having to explicitly turn refresh on for each url.
Refresh by clicking link or button
This is a powerful feature for automatic web page refreshing. By default, Easy Auto Refresh refreshes the web page in the same manner as clicking the standard Refresh button in the browser (or hitting F5 on the keyboard). By enabling this option, Easy Auto Refresh will automatically click a button, link, or an element on the web page to perform the refresh. This is the perfect feature for web pages that already have a refresh link that you typically click to refresh content. For example, you can tell Easy Auto Refresh to click the "Inbox" link on your email web page to have it refresh the content without refreshing the whole window. Or, you could tell it to refresh a stock ticker symbol, without refreshing the entire window. The possibilities are wide open!

Since this is an advanced feature, meant primarily for technical users (knowledge of HTML or jquery is a plus), let's look at some examples that show how to use it.
Example 1 - Find the Element
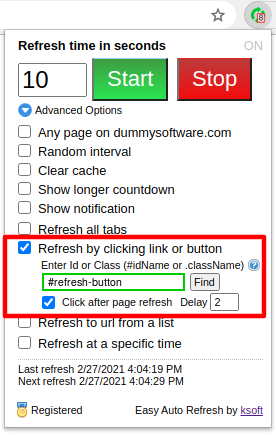
The following steps show how to select an element on the web page to automatically click for refreshing. In this example, we're going to automatically click the button labeled, "refresh".
- Expand the Advanced Options.
- Checkmark the option to Refresh by clicking link or button.
- Click the Find button to select a target element on the page to click.
- Click Start to begin refreshing.
Textbox value: #refresh-button

Example 2 - Gmail
For more advanced situations, you may need to manually find the element id or class name to auto-click. This can be done using the Chrome Inspector tool.
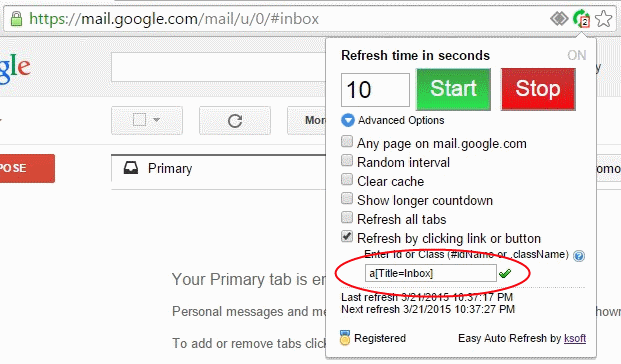
Textbox value: a[Title=Inbox]

You can automatically click the "Inbox" link to quickly refresh your email, without refreshing the entire browser page.
- Navigate to your gmail account and verify your Inbox page is displayed.
- Right-click the link "Inbox" in the left-menu and select "Inspect element".
- Note the type of the HTML tag "a" and the title of the tag "Inbox". This is the tag that you click to refresh your email content.
- In Easy Auto Refresh, checkmark the option "Refresh by clicking link or button".
- In the textbox, enter the value: a[Title=Inbox]
- Verify a green checkmark displays next to the value. This indicates the value is a valid HTML element.
- Turn refresh on. The next time a refresh occurs, Easy Auto Refresh will click the "Inbox" link instead of refreshing the entire browser page. This will refresh just the email content, allowing you to have a much quicker and smoother refresh of your email!
Example 3 - Hotmail
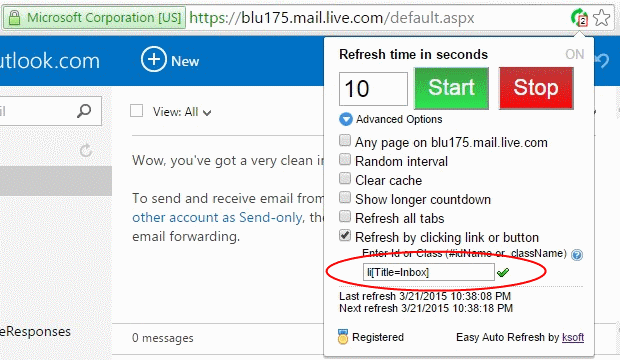
Textbox value: li[Title=Inbox]

- Navigate to your hotmail account and verify your Inbox page is displayed.
- Hit F12 to open the Chrome Developer Tool.
- Click the element inspector tool (magnifying glass icon in the top-left of the Developer Tool window).
- On the web page, click on the "Inbox" link in the left menu.
- The Chrome Developer Tool will highlight the HTML associated with the link. Move your mouse up until it highlights the "li" HTML tag. This is the tag that you click to refresh your email content. Note the HTML tag type is "li" and the title property is "Inbox".
- In Easy Auto Refresh, checkmark the option "Refresh by clicking link or button".
- In the textbox, enter the value: li[Title=Inbox]
- Verify a green checkmark displays next to the value. This indicates the value is a valid HTML element.
- Turn refresh on. The next time a refresh occurs, Easy Auto Refresh will click the "Inbox" link instead of refreshing the entire browser page. This will refresh just the email content, allowing you to have a much quicker and smoother refresh of your email!
Example 4 - IFrame
Textbox value:
document.querySelector('iframe').contentDocument.getElementById('dropdownSearchBtn')
- Navigate to http://www.w3schools.com/html/html_iframe.asp
- In Easy Auto Refresh, checkmark the option "Refresh by clicking link or button".
- In the textbox, enter the value: document.querySelector('iframe').contentDocument.getElementById('dropdownSearchBtn')
- Verify a green checkmark displays next to the value. This indicates the value is a valid HTML element.
- Turn refresh on. The next time a refresh occurs, Easy Auto Refresh will click the button inside the iframe, causing a dropdown menu to display and hide repeatedly.
The steps are the same for any web page with a button or link to click for a refresh of partial content. You can use any HTML or jquery style selector. To click an element with an Id property, use the form "#name" without quotes. To click an element with a Class property, use the form ".class" without quotes.
You can also use a full document.querySelector(...) command to locate the desired HTML element to click. For example, document.querySelector('#myId') will select the element with the id "myId" to click. Also, as shown in Example 3 above, you can select a button inside an iframe with a query such as (all on 1 line):
document.querySelector('#iframeId').contentDocument
.getElementById('dropdownSearchBtn')
For some pages, it may be a little tricky to locate the correct id, class, or selector to use. If you enter an incorrect value, you'll see a red border around the input box, which indicates the element is not valid, or a refresh simply will not occur (ie., nothing was found to click on). In this case, you can try again with a different selector value, or just uncheckmark the option and allow Easy Auto Refresh to refresh the page in the standard way.
Auto-click After a Page Reload
If you want to auto-click the element on the page after a standard page reload, you can checkmark the option Click after page refresh. When you begin refreshing, the page will first reload using a standard web browser refresh and then automatically click the button or link that you've selected.
Adding a Delay
For instances where you need to wait a few seconds after a standard page reload before auto-clicking the button or link, you can enter a number for seconds in the Delay input box. For example, if you enter the value 3, Easy Auto Refresh will first reload the web page with a standard refresh, wait 3 seconds after loading the page, and finally automatically click the selected button or link.
Don't have Easy Auto Refresh installed in Chrome yet? Head on over and download a copy. It's FREE!
|
